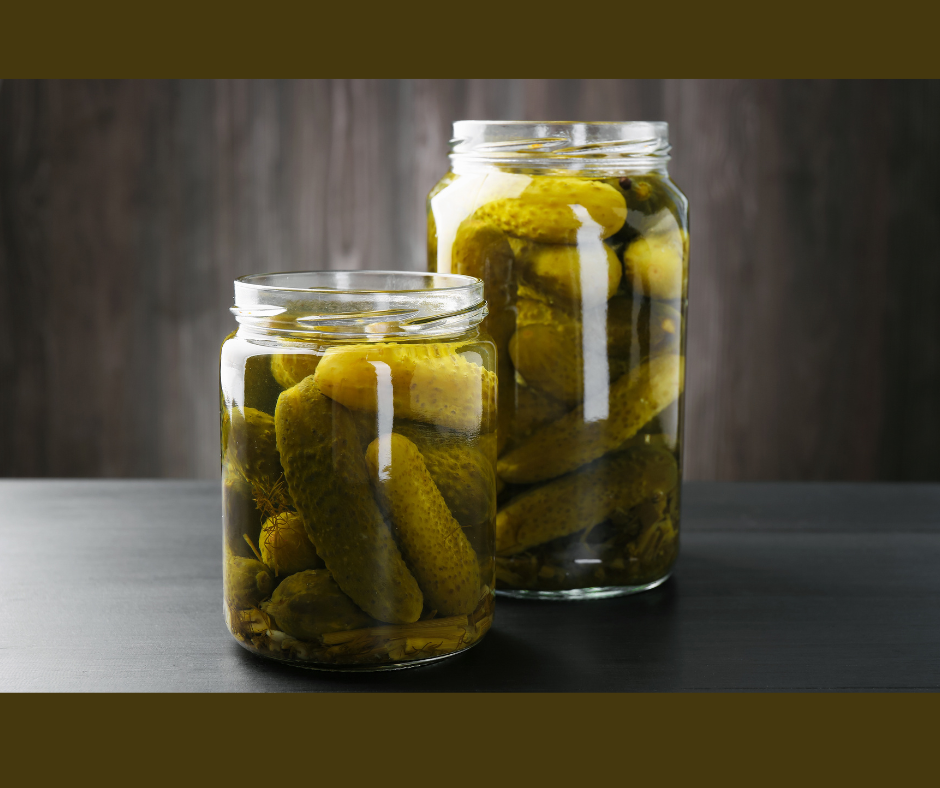
Do you love pickles. I do! I used to grow vegetables for market but now I'm all about growing things that I love to eat. Pickles are a great snack and a great way to get started preserving your own food. I love to eat pickled vegetables strait out of the jar but they are fantastic in sandwiches, tacos, salads, and of course burgers.
They are pretty simple to can and you can make them in small batches. Some versions don’t even need processing (cooking). See my recipes below.
Cucumbers are the vegetable we associate with pickles but there are several vegetables I love for pickling. We will talk about the best varieties. Then Ill go over a super easy way to make pickles.
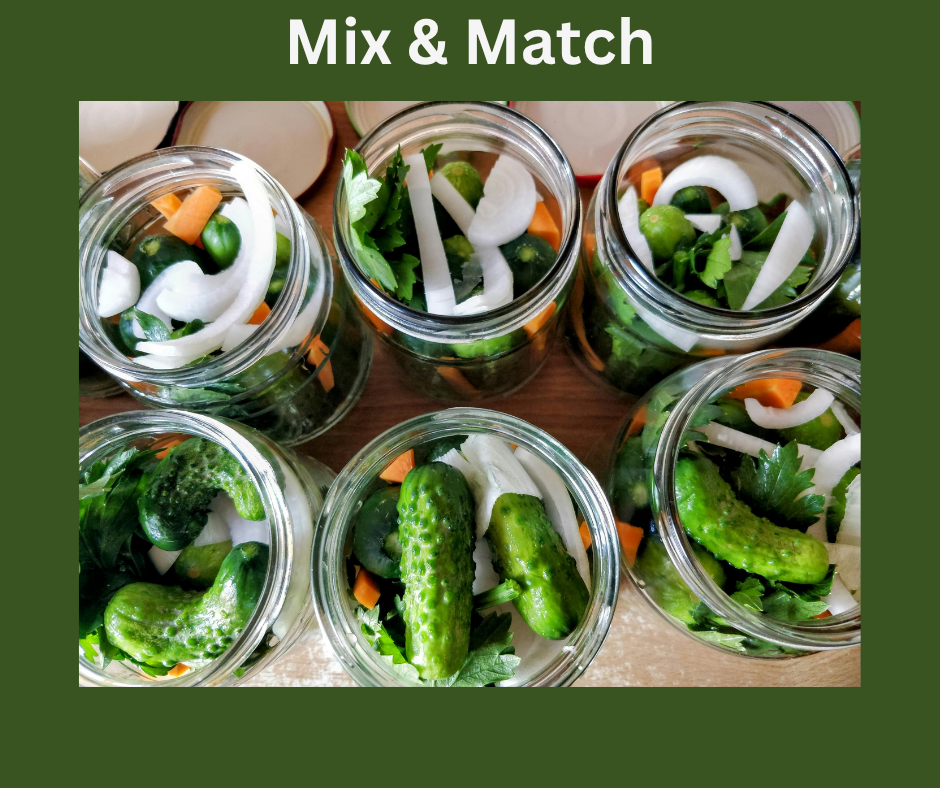
Pickles are fun to make because there are some many vegetables you can combine.
What Makes A Good Pickle?
You want vegetables that have good flavor on their own. Some of my favorites are beans, carrots, beets, radishes, and onions. And of course cucumbers! These vegetables will all grow well in summer and grow in about the same time frame except for the faster radishes. You can plan your seeding schedule so they ripen at the same time. That’s especially helpful if you wish to combine vegetables.
Seeding Schedule Zone 6
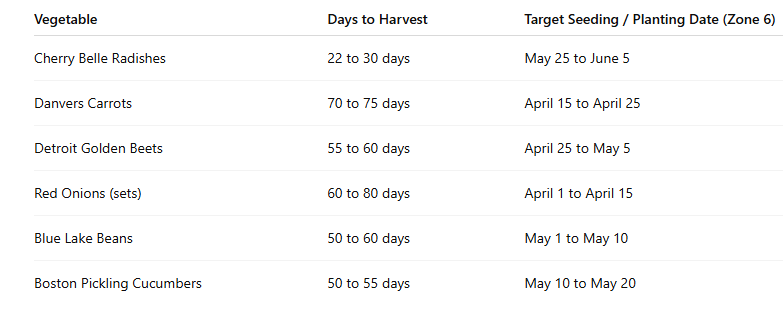
Here is an example seeding schedule of when to plant each crop if you want a harvest date of July 1st in Zone 6. This would allow you to harvest the vegetables around the same time so you could make combinations when putting them in jars. See below for estimates on how much to plant.
What Vegetables Make The Best Pickles?
Cucumbers
Cucumbers are the foundation of any pickle garden. You can pickle any cucumber but pickling cucumbers are different from slicing types. They have thinner skins, fewer seeds, and a firmer texture.
Good varieties include Boston Pickling, which produces small, uniform fruit that pack well into jars. Boston takes 55 days to maturity. Gherkins are small short cucumbers that only take 47 days to reach maturity and can be pickled whole.
Read my article Growing Cucumbers in Zone 6B to get tips on how to grow cucumbers.
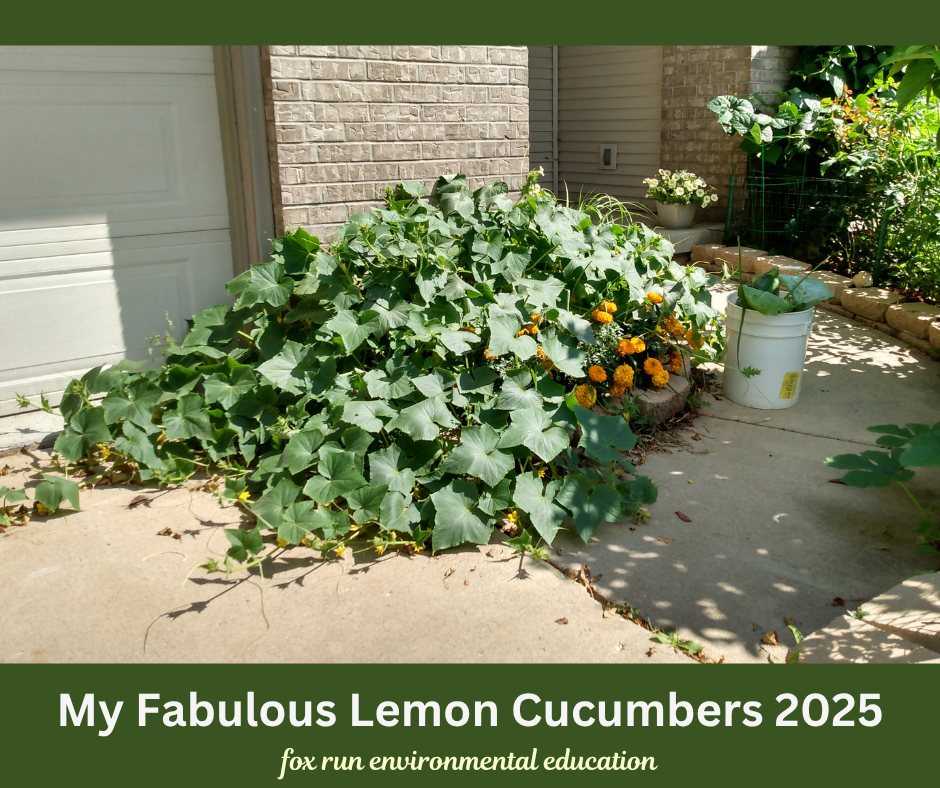
One of my favorite cucumbers for pickles and salads is the lemon cucumber. So productive. This was just from two seeds. I kept having to prune it back as it wanted to invade the driveway!
For something different try cucamelon (Melothria scabra) sometimes called Mexican sour gherkin variety. They are cute and fun and have high yields. These grape sized fruits that look like tiny watermelons and do well in raised beds or containers.
Cucumber Amounts
For 4 pints of pickles, plan on about 2 to 2.5 pounds of pickling cucumbers.
1 pound of cucumbers makes about 1 to 2 pints of pickles, depending on packing and if you cut them. So an average of 10 to 16 gherkin types or 6 to 10 medium cucumbers.
Green Beans (Dilly Beans)
Green beans are great pickled and make fabulous snacks. Dilly beans are pickled green beans flavored with dill, garlic, and red pepper flakes. They are work well as a quick snack, paired with cheese, or added to foods like tuna or egg salad.
In the 60s dilly beans were often served in bars because they went well with cocktails. They are most commonly used in Bloody Mary’s, Caesars, and "dilly bean" martinis. A few dilly beans are added directly to the drink for a crisp, tangy bite. For a Dilly Bean Dirty Martini (or "dilly-tini") use 1/2 to 1 ounce of dilly bean brine instead of olive brine which creates a savory, complex flavor.
Pole beans which are long and skinny make great pickles and are easy to just pop in the jar. Blue Lake and Kentucky wonder are my two favorites. For a more traditional fermented pickle, many gardeners use Contender because it produces tender but firm pods.
Read my article Growing Green Beans in Zone 6
Green Bean Amounts
It takes about ½ to ¾ pound of green beans per pint jar or About 4 to 6 cups of trimmed beans, packed tightly into jars
Carrots
Carrots work well for both sweet and dill pickle recipes. Instead of fries have carrot pickles with your burger.
Short or thick-rooted types tend to stay crisp. Nantes varieties are a good choice because they are firm, crisp, and naturally sweet. Danvers is another super option, especially in heavier soils, because it grows well in less-than-perfect conditions while still producing firm roots.
Depending on the size of the carrots you can use them whole or quarter them.
Carrots can be tricky to grow. I share my experiences growing carrots from seed starting to harvest. Learn my personal favorite varieties.
Carrot amounts
½ to ¾ pound of carrots per pint jar
If you are cutting into slices, expect about 3 to 4 medium carrots per pint jar, depending on thickness and how tightly you pack them.
Beets
I love pickled beets and eat them out of the jar, weird person that I am. Red beets work well but also yellow beets taste fabulous pickled. I like Touchstone Gold and Bolder.
You can use baby beets if you want to can the whole beets. Or cut them up if they are full size. A mandolin slicer makes pretty crinkle cuts if you are making pickles for gifts.
Beet Amounts
It takes about one and a half cups of cubed beets per pint
Radish
Radishes are one of the fastest crops you can grow in a pickle garden. They develop a crisp texture that works well in quick pickles. Cherry Belle the little round ones are a reliable early variety with a mild bite. French Breakfast the longer ones with a milder flavor, which some people prefer for pickling.
Radish Amounts
It will take about 1.5 to 2 cups of radish per pint jar

Checkout my latest book on creating a backyard wildlife garden including beneficial insects and pest eating birds.
Onions
Onions add flavor and texture to mixed pickles. they add flavor and a crisp texture to things like tacos, burgers, and grain bowls.
Small onions like pearl onions are ideal because they can be pickled whole.
If you prefer slicing onions, Red Burgundy or Spanish red onions hold their color well and add visual appeal to jars.
Onion Amounts
If you are using pearl onions, you will need more by count because they are small. Expect about 3 to 4 cups of peeled pearl onions per 2 pints
Flavor
Garlic and dill are essential for flavor. Dill should be planted in succession because it bolts quickly. Bouquet dill is my preferred for pickling because it produces large seed heads and plenty of foliage.
Hot peppers can be added with other vegetables for flavoring or pickled on their own.
Pickles don’t have to be just one vegetable per jar. Mix up your vegetables. Make combinations that sound good to you.
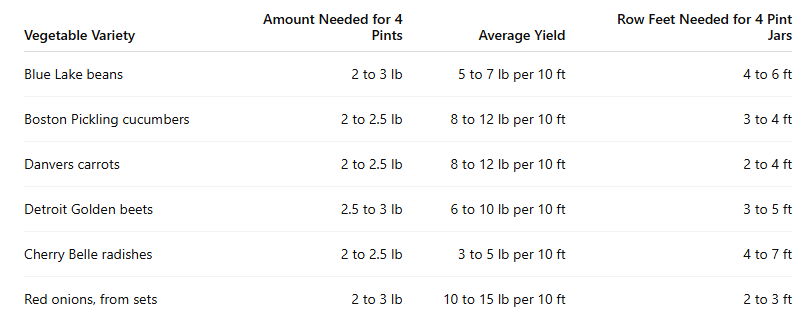
This example chart shows yield and gives the amount of plants in row feet needed for 4 pint jars
Health
The vinegar in pickles has many benefits. Most home recipes have 5% percent with a pH between 2.4 and 4.6. Vinegar not only keeps the food safe but also adds flavor without adding fat. Some research shows that vinegar may help with blood sugar response after meals.
Refrigerator pickles are easy to make
How To Make Pickles
So now lets look at some ways to make pickles. The easiest, most basic way to make pickles is by making refrigerator pickles. Refrigerator pickles don't need any canning equipment. They are also easy to do in small batches. This recipe is super easy and makes 2 pints.
Use fresh vegetables and wash them well. Cut them in the size you want. Wash and sterilize your jars.
mix your brine
2 cup water
1 cup white vinegar
2 teaspoon salt
2 teaspoon sugar
1 lb cucumbers (or your choice vegetables from the article)
4 garlic cloves
4 dill sprigs
Place the ingredients in a pot and set over high heat and bring to a boil. As soon as it starts to boil, turn off the heat, and let cool completely.
While its heating cut up your chosen veggies and flavorings and add them to the jars.
Cool the brine mixture and then pour it over the vegetables. If everything is not submerged, you will need to add more water.
Let them sit and absorb the brine and seasonings for at least 48 hours before eating. They will last up to 2 months in the fridge.
Canning Pickles
You can process pickles in a hot water bath which further destroys any bacteria and allows the jars to be kept for a longer period of time at room temperature. Find a good recipe from an extension office or my favorite is the Ball Blue Book. Many Extension Offices often have canning classes for beginners.
Below are two recipes for canning vegetables.
Pickles are a great way to get started preserving your own food. They are pretty simple to make and you can do it in small batches. Cucumbers are the vegetable we associate with pickles but there are several vegetables I love for pickling. We will talk about the best varieties. Then Ill go over a super easy way to make pickles.
Pickled Dill Beans
This is a tested, evidence-based recipe from the National Center for Home Food Preservation. University of Georgia Extension.
Ingredients
4 pounds of fresh, tender green or yellow beans (5 to 6 inches long)
8 to 16 heads fresh dill
8 cloves garlic (optional)
½ cup canning or pickling salt
4 cups white vinegar (5% acidity)
4 cups water
1 teaspoon hot red pepper flakes (optional)
Yield: 8 pints
Directions
Preparation
Wash hands with soapy water.
Wash beans and trim ends; cut beans into 4-inch lengths.
Follow canning and processing directions below for a safe, shelf-stable product.
Safety Caution: Vinegar used in the pickling process for this specific recipe lowers the pH of the product, making it acidified enough to be safe for processing in a boiling water canner. Fresh beans packed in water (unpickled) are a low-acid food that must be processed at high temperatures in a pressure canner to be safe.
Canning Instructions
Sterilize canning jars in boiling water.
Make a brine of vinegar, water, salt, and pepper flakes (optional). Bring to a boil.
Place 1 to 2 dill heads and, if desired, 1 clove of garlic, in each sterile jar.
Place whole beans upright in jars, leaving ½-inch headspace.
Fill jars with boiling brine, leaving ½ inch headspace.
Remove air bubbles; wipe rims of jars with a dampened, clean paper towel; adjust two-piece metal canning lids.
Process the filled, lidded jars in a boiling water canner for the appropriate time (see Processing Details below).
Carefully remove jars from boiling water; let cool.
Remove screw bands after about 12 to 24 hours.
Label and date product.
Store product in a dark, dry, cool location.
Processing Details
Determine processing times at altitude using a boiling-water canner.
Jar Sizes: Pints
Type of Pack: Raw
Processing Time
At 1 to 1 to 1,000 feet altitude: 5 minutes
At 1,001 to 6,000 feet altitude: 10 minutes
Over 6,000 feet altitude: 15 minutes
Bread and Butter Pickles (My Favorite)
Makes 2 quart jars
INGREDIENTS
For 2 quarts of pickles:
3 1/2 lbs pickling cucumbers (about 14 small to medium)
2 1/2 cups vinegar (5% acidity)
2 1/2 cups sugar
1/4 cup Mixed Pickling Spice
Process
Slice cucumbers into ½ inch slices.
Combine vinegar, sugar, and Mixed Pickling Spice in a medium saucepan and bring to a boil.
Pack based on your preference of the options listed below.
Steps:
Prepare boiling water canner. Heat jars in simmering water until ready to use, do not boil. Wash lids in warm soapy water and set aside with bands.
Pack cucumber slices into a hot jar, leaving a ½ inch headspace.
Ladle hot pickling liquid over slices leaving ½ inch headspace. Make sure cucumbers are covered completely.
Remove air bubbles, wipe rims and center lids on jars. Apply bands and adjust to fingtertip tight.
Place jar in boiling water canner. Place lid on canner.
Process jars 15 minutes, adjusting for altitude. Turn off heat, remove lid, let jars stand 5 minutes.
Remove jars and cool 12-24 hours. Check lids for seal, they should not flex when center is pressed.
For best flavor, allow pickles to stand for 4-6 weeks.
Author, Ame Vanorio, is a lifelong organic gardener and loves making pickles. Check out her books on Amazon.


Radishes are one of the most rewarding vegetables to grow because they grow fast and are the easiest crop ever. They do great in raised beds, containers, or in the ground. Radishes come in lots of fun varieties and all add something special to meals.