
A hibernaculum is a place where wildlife can winter over. Much of the wildlife around us needs a safe place to rest for the winter. Due to urbanization many of their normal places such as old trees and rocky crevices have been removed.
Another plus! Hibernaculums are cheap to build using lots of scrap or discarded materials.
Hibernaculum are built a bit differently for different species. This article will take you through step-by-step instructions for building one geared toward snakes, one for toads, and one for insects.
What Is A Hibernaculum?
A hibernaculum is a shelter that provides protection and a suitable environment for animals to undergo hibernation or brumation. During the long and cold winter months, many animals enter a state of deep sleep called hibernation to conserve energy.
Hibernacula offers insulation from extreme temperatures, humidity control, and protection from predators. These shelters allow animals to slow down their metabolism, reduce their heart rate, and survive until spring when they emerge ready to resume their normal activities.
How Does a Hibernaculum Help the Wildlife in My Backyard?
Hibernacula plays a vital role in the survival and conservation of many species during harsh winter conditions.
Hibernacula are designed to mimic the natural burrows and dens that animals seek out in the wild. By constructing these structures, we can help create additional habitats and increase biodiversity in our local ecosystems.
Hibernacula provides a warm and insulated environment that protects animals from harsh winter conditions, ensuring their survival until spring. They also offer refuge for a wide range of species, including reptiles, amphibians, insects, and small mammals.
By building hibernacula, we can actively contribute to the conservation of wildlife by providing critical overwintering habitat and fostering healthy populations of various species.
Read my article on Feeding Wildlife in Winter.
A bit simplistic but it gives you an idea of ways to layer your snake hibernaculum.
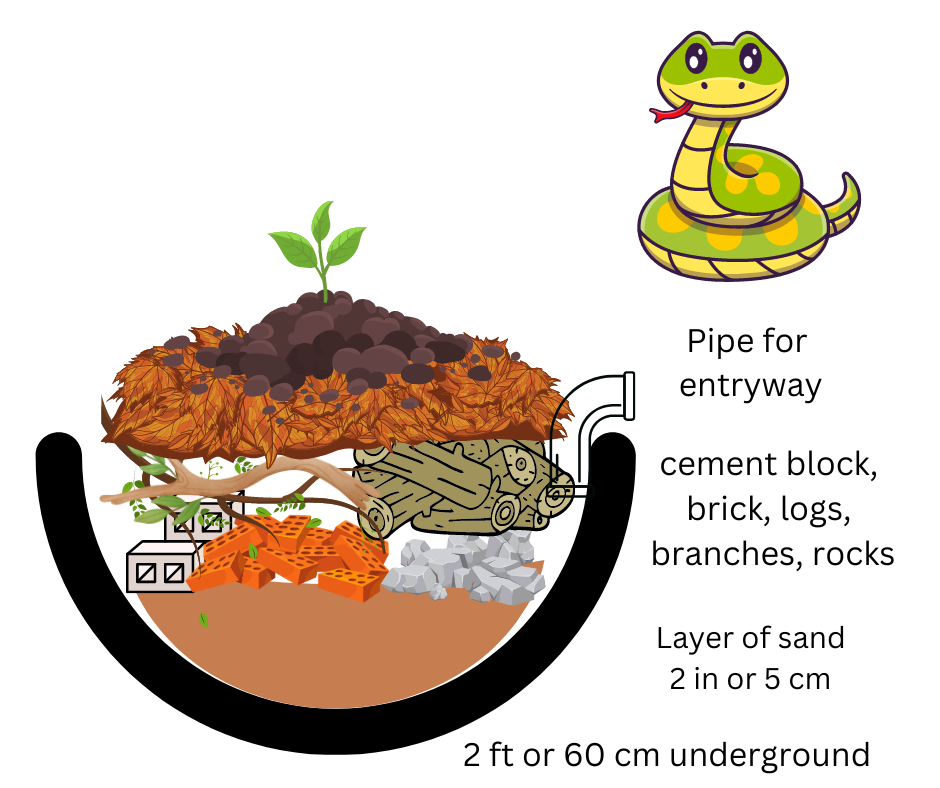
Hibernaculum for snakes. Graphic by Ame Vanorio
Build a Hibernaculum for Snakes
Materials You'll Need:
Shovel
Sand and/or small gravel
Rocks, cement blocks, and/or bricks
Logs or wooden boards
Leaf litter or straw
Soil or sand
Varieties of native plants
Step 1: Choosing the Location
Select a suitable location for the hibernaculum. Find an area that receives ample sunlight for warming during the day but is shaded and protected from the wind. Ideally, choose a site with well-draining soil to prevent water accumulation.
Step 2: Excavating the Space
Use a shovel to dig a hole measuring roughly 2 feet deep and 4 feet wide. (.60 - 1.2 meters). If you live in zone 5 or above go three feet deep if you can. The size can vary depending on the desired capacity of the hibernaculum. Ensure the walls of the hole are gently sloping inward to prevent collapse.
Step 3: Prep the Base
Place 3 - 4 inches (7 - 10 cm) of sand and/or loose gravel in the base. This will provide drainage. Then add a couple of inches of insulating material such as leaves or clean straw. Snakes will burrow into this material, providing insulation against harsh winter temperatures.
Step 4: Create Obstacles
To provide hiding places for snakes, position cement blocks, rocks, or bricks throughout the hibernaculum. Make sure you press them in firmly so they don’t shift and possibly injure an animal.
Create small crevices and spaces for snakes to curl up and rest. Leave room so the several snakes can sleep in the same area. Cement blocks are great and you can place them on the flat side or prop them holes up. You can also place a bit of straw in the cement blocks or around rocks.
Fill in around with some medium-sized rocks to provide stability but keep plenty of wiggle room.
Step 5: Construct Cover
Over the top of the cement blocks and rocks, create a wooden cover using logs, branches, or boards. Make sure it is sturdy enough to hold the weight of fallen leaves, soil, and other debris. This cover will help insulate and protect the hibernaculum.
Garter snakes are surprisingly social and often brumate together. Check out my YouTube channel for wildlife and organic gardening videos.
Step 6: Add some plumbing pipe or small culvert sections. This just adds a nice entry and exit area and also natural airflow. Keep the pipe small around two inches so as not to encourage predators. If you are using white PVC pipe take a file and scratch up the interior of the pipe. This allows for places for the snake’s body to cling to and not slide down the pipe.
Step 7: Soil
Lastly, add some soil and compost on top of the pile. This material will help regulate temperature and humidity within the hibernaculum.
In addition, this gives you a wonderful place to plant some native flowers. As another nice touch place some flat rocks alongside your hibernaculum to provide a nice spot for snakes and toads to soak up the sunshine.

A snake 'hibernaculum' - Illustration by Larry Eifert (larryeifert.com)
Step 8: Plant Native Vegetation
Plant native species around the hibernaculum. These plants will not only provide additional shelter but also attract insects and other invertebrates that serve as food for the snakes.
You can also plant some nice perennial flowers here which will attract pollinators and provide beauty during the warm months.
Step 9: Monitor and Maintain
Regularly check the hibernaculum during the winter months to ensure it remains intact and undisturbed. If any repairs are needed, perform them promptly in order to keep the snakes safe.
Remember, creating a hibernaculum for snakes is a long-term commitment. Once established, it provides critical shelter during the winter months. Ensure the area around the hibernaculum remains undisturbed to encourage long-term use by snakes and enhance conservation efforts.

American toads escape the cold by digging in soft soil underground. You can build a nice toad hibernaculum to meet their needs. Graphic by Ame Vanorio
Build a Hibernaculum for Toads
Toads like hibernaculum that are shallower and provide a higher moisture level. A light sand will allow them to dig down and remain covered. And obviously, they would prefer to not share one with snakes!
Materials Needed:
Shovel or small garden spade
Rocks and stones of various sizes
Broken terra cotta pots or roofing tiles
Fallen leaves and twigs
Logs or timber
Soil or compost
Mulch (such as straw or wood chips)
Leaf litter
Step 1: Choose a Suitable Location
Select a suitable location for your hibernaculum. Look for an area that receives adequate sunlight during the day and is easily accessible for toads. Ideally, the spot should have some natural cover nearby, such as shrubs or trees, to provide further protection.
Step 2: Clear the Area
Use a shovel or small garden spade to clear the area of any grass, debris, or unwanted vegetation. This will provide a clean slate for building your hibernaculum and ensure optimal conditions for toads.
Step 3: Dig a Hole
Dig a hole at least 1-2 feet deep or 0.3 - 0.6 meters within the cleared area. The hole should be large enough to accommodate your desired hibernaculum size and the number of toads you hope to support. The width and length of the hole can vary, but a diameter of 2-3 feet is recommended.
Step 4: Create a Rocky Base
Place a layer of rocks and stones at the bottom of the hole. This will act as a thermal mass, absorbing and retaining heat during the day and slowly releasing it at night. The rocks also provide stability to the hibernaculum structure.

Step 5: Add Organic Material
Next, add a layer of fallen leaves, twigs, and logs on top of the rocks. This organic material will provide insulation and retain moisture, creating a suitable microclimate for the toads. Ensure you leave small gaps or crevices between the materials to allow for airflow.
Step 6: Add Soil or Compost
Add a layer of soil or compost over the organic material. This will help regulate temperature and humidity levels inside the hibernaculum. Ensure that the soil or compost is damp but not saturated. Toads prefer a moist environment for brumation.

A toad abode is good for summer or winter in the Deep South. Terra Coota is a great material since it can breathe and retain moisture. Knock out the bottom and file off any sharp edges so the toad can burrow in the soil.
Read my article on creating a frog-friendly backyard habitat.
Step 7: Cover and Mulch
Cover the hole with logs or timber to create a roof for the hibernaculum. This will protect it from excess rainfall and help retain heat. Layer the roof with additional organic material such as straw or wood chips for extra insulation.
Step 8: Add Leaf Litter
Finally, scatter a layer of leaf litter over the hibernaculum. This will further enhance insulation and mimic the natural leaf litter found in the wild, making it a comfortable and familiar environment for toads.
Step 9: Maintain and Monitor
Keep an eye on the hibernaculum throughout the year, particularly during the hibernation period. Make sure the organic material remains damp and provide occasional misting if needed. Avoid disturbing the structure as much as possible.

This insect hotel contains a variety of materials for different species. It is covered in wire to help keep out predators. Photo by Georgfotoart.
Building an Above Ground and Free-Standing Insect Hibernaculum
Hibernacula provide insects with a safe place to hibernate during the winter months, ensuring their survival and maintaining a healthy ecosystem. Let's get started!
Materials Needed:
Wooden or metal posts (around 6-8 feet tall)
Recycled wood or lumber
Hammer
Nails or screws
Drill
Saw
Pallets or large logs
Bristly material (like straw or dried leaves)
Rocks or bricks
Mulch or wood chips
Step 1: Choose a Location
Select a suitable area for your hibernaculum, preferably near a garden, flower bed, or vegetation. Ensure that the location receives ample sunlight and is protected from strong winds.
Step 2: Prepare the Site
Clear the chosen area of any debris, rocks, or vegetation so you can dig holes for the posts. Set the posts at least 18 inches in the ground so they are stable.
Step 3: Assemble the Frame
Space the posts approximately 1-3 feet apart, in a rectangular or square shape, depending on your desired size. Set the posts securely into the ground, ensuring they are vertical and sturdily positioned.

If you are looking for something smaller - you can purchase a nice hanging model.
Step 4: Build Walls
Attach recycled wood or lumber horizontally to the posts to create the walls of your hibernaculum. Use a piece of plywood for the bottom about 2.5 - 3 feet off the ground. This will help discourage predators such as skunks that eat insects.
Attach boards horizontally. You may want to create multiple floors. Think compartments.
Leave gaps between the boards to allow insects to enter and exit.
Step 5: Fill the Base
Fill the base and “shelves” of your hibernaculum with leftover lumber or small logs, creating a maze-like structure. This will provide diverse spaces and hiding spots for insects to hibernate.
Step 6: Add Bristly and Organic Materials
Fill the compartments. Place bristly materials such as straw or dried leaves within the hibernaculum's walls and in the pallets/log maze. These materials act as insulation and provide hiding places for the insects during hibernation.
Great Eco-Friendly model!
Step 7: Create Hiding Spots
Position rocks or bricks within the hibernaculum to create additional crevices and hiding spots. This will contribute to the structural diversity and provide additional shelter options for insects.
Step 8: Cover the Top
If desired, cover the top of your hibernaculum with a layer of mulch or wood chips. This will further insulate the hibernaculum and help retain moisture.
Step 9: Monitor and Maintain
Regularly check your hibernaculum throughout the year. Ensure that the materials remain in place and are not disturbed. Make any necessary repairs or adjustments as needed.

Grand Insect Hotel. This particular hibernaculum is multi-purpose with lots of spaces for insects as well as stones and terra cotta along the ground level for amphibians and reptiles. Located in Cornwall, England. Photo by Martinvl.
Bonus Log Pile
Both log piles and stone piles provide excellent areas for wild animals to hide. Just pile up logs and branches in an out-of-the-way corner of your yard. Every time you are doing some pruning or clearing rocks from the vegetable garden just add to your pile.

Author Ame Vanorio is the director of Fox Run EEC. Check out the MY BOOKS page for more information about her adult and children’s books.


Bluebirds are beautiful birds that are symbols of joy and hope. They are also cavity nesters and loss of habitat has affected their populations in a negative way.
This article will share with you the WHY and HOW of attracting bluebirds to your yard. In addition, we have some guidance for you to purchase or make bluebird housing and where to place it.